Looking for Instructions?
- Winter Snowflake Bracelet Kit Instructions
- Winter Dreams Bracelet Kit Instructions
- White Christmas Bracelet Kit Instruction
- Victorian Chic Bracelet Kit
- United Heart Bangle Bracelet Kit Instructions
- United Bracelet Kit
- United Bangle Bracelet Kit Instructions
- Tourmaline Stretch Bracelet Kit Instructions
- Totally Turquoise Bracelet Kit Instructions
- Temping Tourmaline Bracelet Kit Instructions
- Tanzanite Glitter Bracelet Kit Instructions
- Tantalizing Tube Bangle Bracelet Kit Instructions
- Tahitian Nights Bracelet Kit Instructions
- Swarovski Spike Double Tube Bracelet Kit Instructions
- Swarovski Rose Gold Spike Bracelet Kit Instructions
- Swarovski Letra Bracelet Kit Instructions
- Swarovski Crystal & Tree Of Life Charm Bracelet Kit Instructions
- Stunning Murano Bracelet Kit
- String of love Bracelet Kit Instruction
- Sterling Marque Bracelet Kit Instructions
- Star Shine Bracelet Kit Instructions
- Stacked Treasures Bracelet Kit Instructions
- Stacked Silver Bracelet Kit Instructions
- Sparkling Gemstone Weave Bracelet Kit Instructions
- Silver Leaf with Jet Stone and Pyrite Bracelet Kit Instructions
- Shades of Blue Bracelet Kit
- Satin and Shine Gemstone Bracelet Kit
- Rose Gold Confetti Bracelet Kit Instructions
- Rose Glitter Bracelet Kit Instructions
- Rondell Gemstone Bracelet Kit Instructions
- Reflections Bracelet Kit Instructions
- Red Velvet Christmas Bracelet Kit Instructions
- Re-Designed Imperial Bangle Bracelet Kit
- Purple Kunzite Hex-Cut Charm Bracelet Kit
- Pretty in Pink Bracelet Kit Instructions
- Precious Treasure Bracelet Kit Instructions
- Pink Opal Lotus Bracelet Kit
- Pink Opal & Rose Gold Bracelet Kit Instructions
- Petite Tree of Life Gemstone Bracelet - Jewelry Making Kit Instructions
- Petite Mixed Metal Stacked Silver Bracelet Instructions
- Petite Hope Bracelet Kit Instructions
- Petite Fall Bracelet Kit Instructions
- Petite Cross Bracelet Kit Instructions
- Peach Sunstone Gemstone Bracelet Kit Instructions
- Pave Hematite Bracelet Kit Instructions (Free Gift)
- Pastel Perfection Bracelet Kit Instructions
- Paradise Shine Swarovski Bicone Weave Bracelet - Jewelry Making Kit Instructions
- Paradise Shine Fine Rock Tube Bracelet Kit Instructions
- Onyx Gemstone Wrap Bracelet Instructions
- Ocean Confetti Bracelet Kit Instructions
- Obsessed with Obsidian Bracelet Kit Instructions
- Natural Pink Opal Gemstone Bracelet Kit Instructions
- Natural Larimar Pillow Bead Gemstone Bracelet Kit Instructions
- Murano Mothers Day Bracelet Kit Instructions
- Morganite Gemstone Bracelet Kit Instructions
- Moonstone Silver Night Bracelet Kit Instructions
- Moonlight Chain Linked Bracelet Kit Instructions
- Moonlight Chain Linked Bracelet Kit
- Mixed Morganite Gemstone Bracelet Kit Instructions
- Mixed Moonstone Gemstone Bracelet Kit Instructions
- Mixed Metals Gemstone Drop Bracelet Kit Instructions
- Mixed Metals Double Spike Bracelet Kit Instructions
- Mixed Metal Station Bracelet Kit Instructions
- Mixed Metal Link Bracelet Kit Instructions
- Minimalist Metals Bracelet Kit Instructions
- Midnight Weave Bracelet Kit Instructions
- Midnight Magic Gemstone Bracelet Kit Instructions
- Magnificent Moonlight Bracelet Kit Instructions
- Magnificent Metals Bangle Bracelet Kit Instructions
- Luxe Gemstone Bracelet Kit Instructions
- Lovely Lotus Bracelet Kit Instructions
- Lovely Larimar and Apatite Bracelet Kit Instructions
- Love is in the Air Bracelet Kit Instructions
- Little Larimar Gemstone Bracelet Kit Instructions
- Linked Turquoise Bracelet Kit Instructions
- Leopard Skin Agate Gemstone Bracelet Instructions
- Larimar Gemstone Bracelet Kit Instructions
- Lapis and gold gemstone bracelet - jewelry making kit Instructions
- Kyanite Tree of Life Bracelet Kit Instructions
- Jet Hematite And Baroque Pearl Bracelet Kit
- Illuminating Tanzanite Bracelet Kit Instructions
- Illuminating Swarovski Vitrail Bracelet Kit Instructions
- Illuminating Swarovski Indicolite Bracelet and Earring Kit Instructions
- Illuminating Iris Bracelet Kit Instructions
- Illuminating Indicolite Bracelet Kit Instructions
- Hypersthene and Navajo Pearl Jewelry Kit Set Instructions
- Hexagon Gemstone Tassel Bracelet Kit Instructions
- Green with Envy Bracelet Kit Instructions
- Green Opal and Jade Bracelet Kit Instructions
- Golden Shadow Spike Bracelet Kit Instructions
- Golden Shadow Fine Rock Tube Bracelet Kit Instructions
- Golden Evening Out Bracelet Kit Instructions
- Golden Borealis Bracelet Kit Instructions
- Glittering Gold Bracelet Kit Instructions
- Glitter Bracelet Kit Instructions
- Gemstone Stack Bracelet Kit Instructions
- Gemstone Mini Stack Bracelet Kit Instructions
- Gemstone Bolo Bracelet Kit
- Gems of the Sea Bracelet Kit Instructions
- Gems of the Earth Bracelet Kit Instructions
- Galaxy Bracelet Kit Instructions
- Fine Rock Bermuda Bracelet Kit Instructions
- Fancy Jasper Tassel Bracelet Kit
- Faceted Star and Moonstone Bracelet Kit
- Faceted Larimar Gemstone Bracelet Kit Instructions
- Faceted Hexagon Gemstone Stack Bracelet Kit Instructions
- Evening Out Bracelet Kit Instructions
- Enchanted Bracelet and Earring Kit Instructions
- Easy Elegance Bracelet Kit Instructions
- Dragons Blood Jasper Gemstone Bracelet Kit Instructions
- Double Strand Blue African Turquoise Bracelet Kit Instructions
- DIY Jewelry Kit - Very Berry Bracelet Instructions
- DIY Jewelry Kit - Swarovski Jonquil Butterfly Bracelet Instructions
- DIY Jewelry Kit - Swarovski Caviar Crystal Bracelet Kit Instructions
- DIY Jewelry Kit - Sparkling Chalcedony Bracelet Ki Instructions
- DIY Jewelry Kit - Shimmering Swan Bracelet Kit Instructions
- DIY Jewelry Kit - Madeira and Murano Bracelet and Earring Kit Instructions
- DIY Jewelry Kit - Butterflies In Flight Bracelet Or Anklet Instructions
- DIY Jewelry Kit - Blue Dragonfly Bangle Bracelet Kit
- DIY Jewelry Kit - Aquatic Collection Anklet / Bracelet Instructions
- DIY Gemstone Bracelet Kit - Larimar Lotus Bracelet Instructions
- DIY Gemstone Bracelet / Earring Kit - Brazilian Kyanite Bracelet and Earring Instructions
- DIY Bracelet Kit - The Imperial Bracelet Instructions
- DIY Bracelet Kit - Tantalizing Tila Bracelet Instructions
- DIY Bracelet Kit - Seaside Larimar Bracelet Kit Instructions
- DIY Bracelet Kit - Pristine Pyramid Bracelet Instructions
- DIY Bracelet Kit - Petite Pyramid Bracelet Kit Instructions
- DIY Bracelet Kit - Petite Precious Metals Bracelet Instructions
- DIY Bracelet Kit - Mixed Metal Stacked Silver Bracelet Instructions
- DIY Bracelet Kit - Mini Murano Bracelet Instructions
- DIY Bracelet Kit - Luxe Swarovski Bracelet Instructions
- DIY Bracelet Kit - Jade Dragonfly Bracelet Instructions
- DIY Bracelet Kit - Girls love Pearls Instructions
- DIY Bracelet Kit - Blue Chalcedony Flower Bracelet Instructions
- DIY Bracelet Kit - 3 In 1 Shimmering Stack Bracelet
- Denim Dreams Bracelet Kit Instructions
- Delicate Dragonfly Bracelet Kit Instructions
- Dark Shadow Bracelet Bangle Kit Instructions
- Dainty Oval Bracelet Kit
- Crystal Shamballa Bracelet Kit Instructions
- Crystal Paradise Shine Fine Rock Tube Bangle Bracelet Kit Instructions
- Crystal Oval Shamballa Bracelet Kit
- Crystal Coral Bracelet Kit Instructions
- Cracked Agate Stretch Bracelet Kit
- Cozy Colors Bracelet Kit Instructions
- Classic Rock Candy Bracelet Kit Instructions
- Christmas Bows Bracelet Instructions
- Center Stage Bracelet Kit Instructions
- Celestite and Aquamarine Bracelet Kit Instructions
- Carmel Confetti Bracelet Kit Instructions
- Captured Chrysolite Bracelet Kit Instructions
- Candy Cane Christmas Bracelet Weave Kit Instructions
- Butterfly Swarovski Pearl Bracelet Kit Instructions
- Burma Jade Dragonfly Bracelet Kit Instructions
- Brecciated Jasper Gemstone Bracelet Kit Instructions
- Botswana Agate and Charoite Gemstone Stack Bracelet Kit Instructions
- Bold Statement Bangle Bracelet Kit Instructions
- Blended Topaz Bracelet Kit Instructions
- Beautiful Black Diamond Bracelet Kit Instructions
- Azore Reflections Bracelet Kit Instructions
- Aurora Bracelet Kit Instructions
- Aurora Bracelet Jewelry Kit Instructions
- August Birthstone Bracelet Kit Instructions
- Amethyst Gemstone Stretch Bracelet Kit Instructions
- Amethyst Dreams Bracelet Kit Instructions
- Amethyst Chariote Bracelet Kit Instructions
- Amazonite with African turquoise Gemstone Bracelet Kit Instructions
- African Sunset Murano Bracelet Kit Instructions
- Winter Snowflake Pendant Kit Instructions
- Winter Snowflake Earring Kit Instructions
- Turtle Dove Christmas Earring Kit Instructions
- Swarovski Pave Christmas Ornament Earring Kit Instructions
- Sparkling Snowflake Earring Kit Instructions
- Sparkling Santa Earring Kit Instructions.
- Sparkling Rudolph Earring Kit Instructions
- Sparkling Angel Ornament Kit Instructions
- Snowball Drop Earring Kit Instructions
- Silver Bells Christmas Earring Kit Instructions
- Rudolph Christmas Tree Ornament Kit Instructions
- Poinsettia Ornament Kit Instructions
- Pave Snowball Christmas Earring Kit Instructions
- Pave Santa Christmas Ornament Instructions
- Nut Cracker Christmas Earring Kit Instructions
- Mini Santa Christmas Sun Catcher / Ornament Kit Instructions
- Mini Ornament Christmas Earring Kit
- Lil Rudolph Christmas Earring Kit Instructions
- Holiday Bell Christmas Ornament Kit
- Grinch Christmas Ornament Kit Instructions
- Golden Drop Christmas Tree Earring Kit Instructions
- Golden Christmas Tree Earring Kit Instructions
- Golden Candle Christmas Earring Kit Instructions
- Golden Angel Christmas Ornament Kit
- Ginger Bread Man Earring Kit Instructions
- Christmas Wreath Earring Kit Instructions
- Christmas Stocking Earring Kit Instructions
- Christmas Gnome Earring Kit Instructions
- Christmas Bows Bracelet Instructions
- Captured Crystal Snowflake Earring Kit Instructions
- Candy Cane Christmas Bracelet Weave Kit Instructions
- 2018 Candy Cane Earring Kit Instructions
- Winter Sparkle Christmas Ornament
- Very Valentines Sun Catcher Kit
- Valentines Day Sun Catcher Kit Instructions
- Valentines Day Heart Crystal Creation Kit Instructions
- Spring Forward Sun Catcher Kit Instructions (cross)
- Spring Butterfly Sun Catcher Instructions
- Sparkling Shamrock Earring Kit Instructions
- Sparkling Christmas Tree Ornament Kit Instructions
- Sparkling Angel Ornament Kit Instructions
- Rudolph Christmas Tree Ornament Kit Instructions
- Purple Passion sun Catcher Kit Instructions
- Puppy Paws Sun Catcher Kit
- Poinsettia Ornament Kit Instructions
- Pave Snowman Christmas Ornament Kit Instructions
- Pave Santa Christmas Ornament Instructions
- Murano and Strass Sun Catcher Kit
- Mini Santa Christmas Sun Catcher / Ornament Kit Instructions
- Mini Ornament Christmas Earring Kit
- Lucky the Leprechaun Sun Catcher Kit Instructions
- Holiday Bell Christmas Ornament Kit
- Halloween Sun Catcher Instructions
- Guardian Angel Sun Catcher Kit Instructional Video
- Grinch Christmas Ornament Kit Instructions
- Golden Angel Christmas Ornament Kit
- Flowers (May flowers)
- Fire Opal Flower Kit
- Fancy Flower Sun Catcher Kit Instructions
- DIY Sun Catcher Kit - Tangerine Dreams Earring Kit Instructions
- DIY Sun Catcher Kit - Pendulum Drop Sun Catcher Instructions
- DIY Sun Catcher Kit - Mom Sun Catcher Instructions
- DIY Sun Catcher Kit - Heavenly Angel Sun Catcher
- DIY Kit - Swarovski Butterfly Suncatcher Instructions
- DIY Jewelry Kit - Limited Release - Swarovski Light Siam Sun Catcher Instructions
- DIY Crystal Creations Kit - Stunning Pink Flower Kit Instructions
- DIY Crystal Creation - Lovely Lavender Kit
- Crystal Violet Angel Suncatcher Kit Instructions
- Crystal Cross Kit Instructions
- Crystal Creation Kit - Sunshine Sunflower Instructions
- Crystal Cat Sun Catcher Kit Instructions
- Christmas Sparkle Ornament Kit Instructions
- Christmas Ornament Kit Instructions
- Christmas Creation Kit Instructions
- Captured Crystal Snowflake Sun Catcher Kit Instructions
- Bumble Ornament Kit Instructions
- Artistic Expressions Sun Catcher Kit Instructions
- 7 Chakra Sun Catcher Kit
- Winter Snowflake Earring Kit Instructions
- Wicked Witch Earring Kit Instructions
- Vitrail Heart Earring Kit
- Vintage Swarovski Modular Array Earring Kit Instructions
- Vintage Centerstage Earring Kit Instructions
- Valentines Day Bear Earring Kit Instructions
- United Lantern Earring Kit
- United Heart Earring Kit Instructions
- Two Tone Acrylic Earring Kit Instructions (Ocean Vibe, Sea Breeze, Sparkling Wine)
- Twinkle Little Star Earring Kit Instructions
- Twilight Sparkle Earring Kit Instructions
- Turtle Dove Christmas Earring Kit Instructions
- Too Chic to Be Square Earring Kit Instructions
- Tin Man Earring Kit Instructions
- Thanksgiving Turkey Earring Kit
- Swarovski Pave Christmas Ornament Earring Kit Instructions
- Swarovski Fine Rock Contour Earring Kit Instructions
- Stunning Silver Tear Drop Earring Kit Instructions
- Starshine Earring Kit
- Stars and Stripes Earring Kit Instructions
- Star Light Earring Kit Instructions
- Stacked Smoke Topaz Earring Kit Instructions
- Stacked Silver Earring Kit Instructions
- Spring Forward Sun Catcher Kit Instructions
- Sparkling Snowflake Earring Kit Instructions
- Sparkling Sea Turtle Earring Kit Instructions
- Sparkling Rudolph Earring Kit Instructions
- Silver Statement Earring Kit Instructions
- Silver Drop Earring Cuff Kit Instructions
- Silver Bells Christmas Earring Kit Instructions
- Silver and Gold Earring Kit Instructions
- Shades of Spring Earring Kit Instructions
- Shades of Spring Earring - Jewelry Making Kit Instructions
- Shades of Blue Earring Kit
- Seraphanite Gemstone Earring Kit
- Scary Skulls Halloween Earring Kit Instructions
- Scarecrow Earring Kit Instructions
- Rose Gold CZ Drop Earring Kit
- Retro Rings Earring Kit
- Pretty Little Pearls Earring Kit Instructions
- Pretty in Pink Earring Kit Instructions
- Precious Treasures Earring Kit Instructions
- Powder Rose Earring Kit Instructions
- Petite Fall Tube Earring Kit Instructions
- Peep Trio Earring Kit Instructions
- Peep Chicks Earring Kit Instructions
- Paws of Love Earring Kit Instructions
- Pave Snowball Christmas Earring Kit Instructions
- Outer Limits Earring Kit Instructions
- Nut Cracker Christmas Earring Kit Instructions
- Mouse in the House Acrylic Earring Kit Instructions
- Mixed Metals Heart Drop Earring Kit Instructions
- Mixed Metals Gold and Silver Link Earring Kit Instructions
- Mixed Metal Drop Earring Kit Instructions
- Minimalist Metals Earring Kit
- Midnight Weave Earring - Jewelry Making Kit Instructions
- Magical Moonstone Earring Kit Instructions
- Love is in the Air Earring Kit Instructions
- Little Angel Earring Kit Instructions Free Gift
- Lil Rudolph Christmas Earring Kit Instructions
- Light Rose Heart Earring Kit Instructions
- Larimar Faceted Gemstone Earring Kit Instructions
- Larimar and Pearl Earring Kit Instructions
- Labradorite Tear Drop Earring Kit Instructions
- Jubilee the Busy Bee Earring Kit Instructions
- January Birthstone Earring Kit Instructions
- Illuminating Swarovski Indicolite Bracelet and Earring Kit Instructions
- Hypersthene and Navajo Pearl Jewelry Kit Set Instructions
- Heart Drop Earring Kit Instructions (Glittering Galaxy /Sparkling Siam Heart Earring Kit)
- Heart Drop Earring Kit Instructions
- Happy Humming Bird Earring Kit
- Golden Triangle Earring Kit
- Golden Statement Acrylic Earring Jewelry Making Kit Instructions
- Golden Starburst Earring Kit Instructions
- Golden Drop Earring Kit Instructions
- Golden Captured CZ Earring - Jewelry Making Kit Instructions
- Golden Candle Christmas Earring Kit Instructions
- Golden Bliss Earring Kit Instructions
- Going Gold Earring Kit Instructions
- Glittering Grace Earring Kit Instructions
- Glitter Earring Kit Instructions
- Ginger Bread Man Earring Kit Instructions
- Ghost Trio Halloween Earring Kit Instructions
- Gemstone Wrap-Up Earring Kit Instructions (very Berry earring kit)
- Gems of the Earth Earring Kit Instructions
- Floating Crystal CZ Earring Kit Instructions
- Falling for you Earring Kit Instructions
- Faceted Hexagon Gemstone Earring Kit Instructions
- Enchanted Bracelet and Earring Kit Instructions
- Easter Drop Earring Kit Instructions
- Drops of Crystal Earring Kit Instructions
- Dragon Fly Earring Kit Instructions
- DIY Jewelry Kit - Madeira and Murano Bracelet and Earring Kit Instructions
- DIY Jewelry Kit - Luminous Lampwork Earring and Pendant Instructions
- DIY Jewelry Kit - Floating Butterfly Earring Instructions
- DIY Jewelry Kit - Diamond Pearl Earring Kit Instructions
- DIY Jewelry Kit - Crystal Starfish Earring Kit
- DIY Jewelry Kit - Acrylic Chevron Earring Kit Instructions
- DIY Earring Kit - Stacked Silver Pyramid-Cut Earrings
- DIY Earring Kit - Stacked Silver Earrings Instructions
- DIY Earring Kit - Penta Drop Earring Instructions
- DIY Earring Kit - Jet Hematite Delight Instructions
- DIY Earring Kit - Easter Basket Earring Instructions
- DIY Earring Kit - Dragonfly Drop Earring Instructions
- Curved Acrylics Earring Kit Instructions
- Crystal Moonlight Heart Drop Earring Kit
- Crystal Delight Earring Kit Instructions
- Crystal AB Starfish Earring Kit Instructions
- Christmas Wreath Earring Kit Instructions
- Christmas Stocking Earring Kit Instructions
- Christmas Gnome Earring Kit Instructions
- Cascading Crystal Earring Kit
- Captured CZ Drop Earring Kit Instructions
- Captured Crystal Snowflake Earring Kit Instructions
- Captured Crystal Earring Kit
- Bodacious Bordeaux Earring Kit Instructions
- Blue Moon Earring - Jewelry Making Kit Instructions
- Blended Topaz Earring Kit Instruction
- Bermuda Blue Heart Drop Earring Kit
- Beautiful Butterfly Earring Kit Instructions
- Azore Drop Earring Kit
- Aurora Earring Kit Instructions
- Aurora Earring Jewelry Kit Instructions
- All Seeing Eye Earring Kit Instructions
- Air Blue Opal Rock Candy Earring Kit Instructions
- Acrylic Heart Drop Earring Kit Instructions (Galaxy Heart, Sparkling Heart)
- 3 Tier Octagon Earring Kit Instructions
- 2018 Candy Cane Earring Kit Instructions
- Too Cute Pave Easter Bunny Earring Kit Instructions
- Peter Pearlescent Earring Kit Instructions
- Peep Trio Earring Kit Instructions
- Peep Chicks Earring Kit Instructions
- Easter Drop Earring Kit Instructions
- DIY Acrylic Earring Kit - Tri-Color Easter Eggs Instructions
- Bow the Bunny Earring Kit Instructions
- Witch Hat Earring Kit Instructions
- Witch Halloween Earring Kit Instructions
- Wicked Witch Earring Kit Instructions
- Tombstone Halloween Earring Kit Instructions
- Spooky Ghost Halloween Earring Kit Instructions
- Spooky Charm Halloween Bracelet Kit Instructions
- Sparkle Skull Halloween Earring Kit
- Skully the Skeleton Halloween Earring Kit Instructions
- Scary Skulls Halloween Earring Kit Instructions
- Scarecrow Earring Kit Instructions
- Pumpkin with Witches Hat Earring Kit Instructions
- Pumpkin Halloween Earring Kit
- Happy Pumpkin Halloween Earring Kit Instructions
- Halloween Trio Earring Kit Instructions
- Halloween Sun Catcher Instructions
- Ghost Trio Halloween Earring Kit Instructions
- Ghost Trio Halloween Earring Kit
- Frankenstein's Monster Halloween Earring Kit Instructions
- Dangling Spider Halloween Earring Kit
- Crystal Cat Earring Kit Instructions
- Coffin Halloween Earring Kit
- Cat Halloween Earring Kit
- Candy Corn Halloween Earring Kit Instructions
- Winter Snowflake Pendant Kit Instructions
- Vintage Swarovski Rocky Cut Necklace Kit Instructions
- Vintage Swarovski Cube Necklace Kit Instructions
- Two Tone Lariat Kit Instructions
- Stunning Silver Tear Drop Necklace Kit
- Stacked Silver Necklace Kit Instructions
- Silver Navette Necklace Kit Instructions
- Perfect Patina Necklace Kit Instructions
- Night Shimmer Lariat Necklace Kit Instructions
- Murano Lariat Necklace Kit Instructions
- Minimalist Necklace Kit Instructions
- Larimar Faceted Gemstone Necklace Kit Instructions
- Fall Leaf Pendant Kit Instructions
- DIY Jewelry Kit - Swarovski Double Frame Necklace Kit Instructions
- DIY Jewelry Kit - Luminous Lampwork Earring and Pendant Instructions
- Autumn Leaf Pendant Kit Instructions
- Aurora Necklace Kit Instructions
- Artistic Accents Necklace Kit Instructions
- Very Valentines Sun Catcher Kit
- Valentines Day Sun Catcher Kit Instructions
- Valentines Day Bear Earring Kit Instructions
- Too Cute Love Bear Earring Kit Instructions
- Powder Rose Earring Kit Instructions
- Love is in the Air Earring Kit Instructions
- Love is in the Air Bracelet Kit Instructions
- Crystal Moonlight Heart Drop Earring Kit
Sparkling Christmas Tree Ornament Kit Instructions
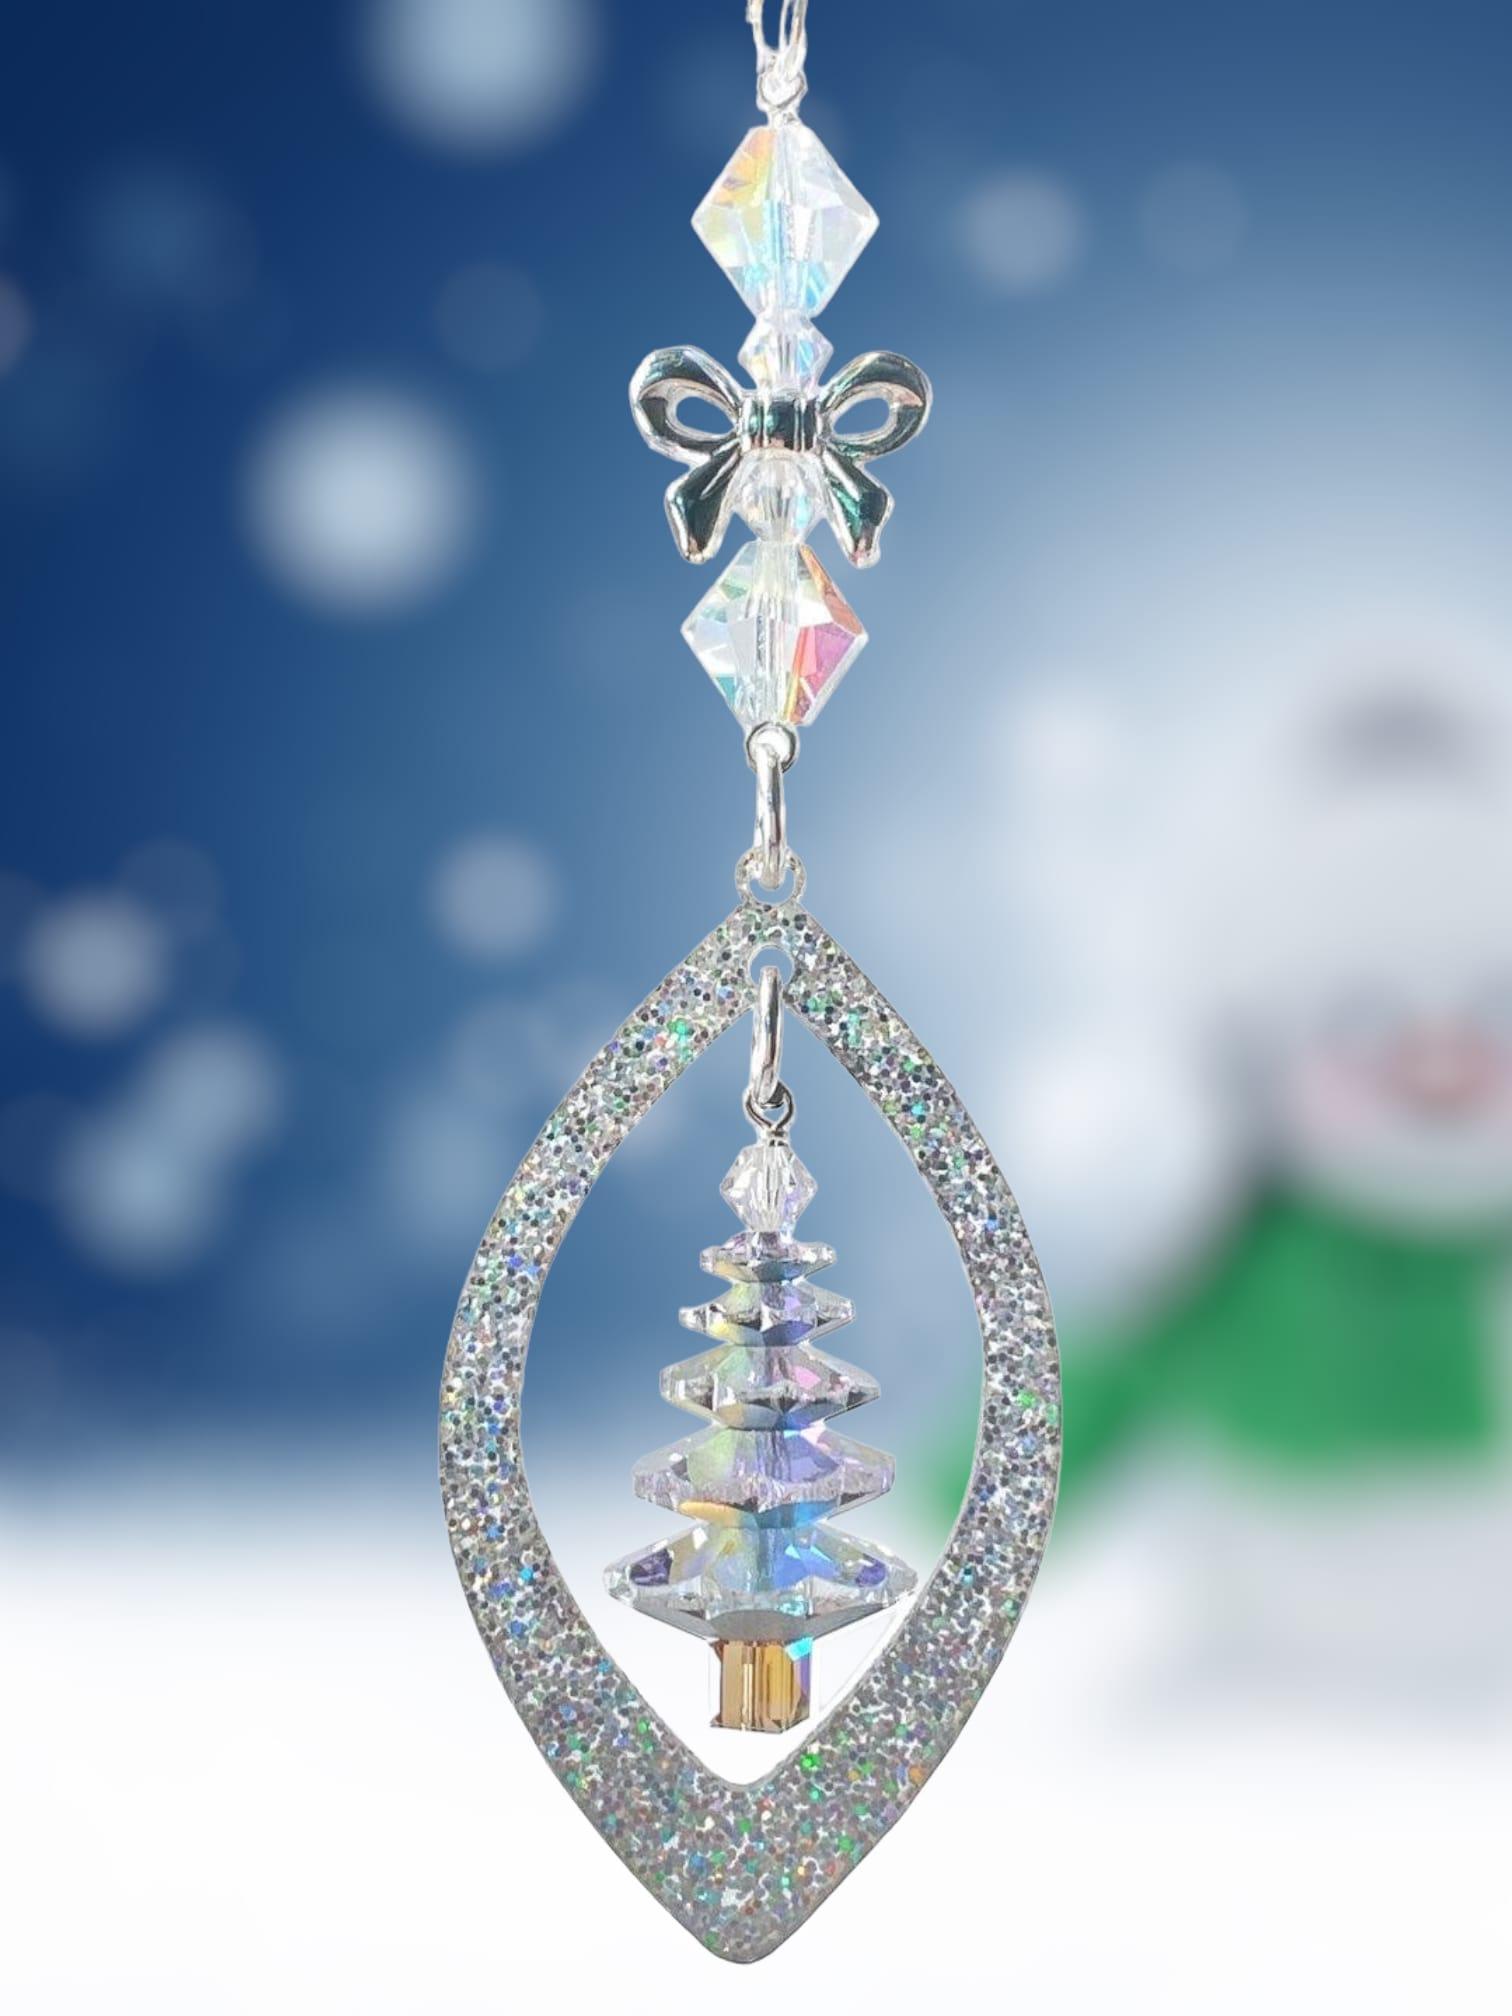 Instructions:
Step 1: Prepare the Acrylic Frame
- Carefully remove the protective coating from your acrylic frame. Ensure that the frame is clean and free of any residues.
Step 2: Create the Tree
- Using the head pin, assemble your tree component by following the specific arrangement provided on the card. Ensure each piece is secure.
Step 3: Wrap and Trim
- Securely wrap the head pin to avoid any components falling off, using your pliers for a tight wrap.
- Trim any excess wire protruding, using your wire cutters, ensuring no sharp edges remain.
Step 4: Attach Tree to Frame
- Open a jump ring using your pliers.
- Attach the tree component to the bottom hole of your acrylic frame through the jump ring.
- Ensure the jump ring is closed securely.
Step 5: Create the Bead Sequence
- On your eye pin, string the following sequence:
- Large Bicone
- Small Bicone
- Bow Bead
- Small Bicone
- Large Bicone
- Make sure the arrangement is tight and orderly.
Step 6: Wrap the Eye Pin
- Using your pliers, wrap the eye pin securely to ensure the bead sequence is held firmly.
- Trim any excess wire with your wire cutters, leaving no sharp ends.
Step 7: Attach Bead Sequence to Frame
- Using another jump ring, attach the bead sequence to the top hole in your acrylic frame.
- Securely close the jump ring, ensuring the entire piece is well connected and stable.
Final Review
- Once all pieces are attached securely, review the entire piece to make sure every component is in place and the piece is stable and secure.
- Make any adjustments if necessary, and your decorative piece is ready to be displayed!
Updated on 18 May 2026